

24-hour national service hotline
Please contact us for further information
contact>>date:2017-08-11 14:36
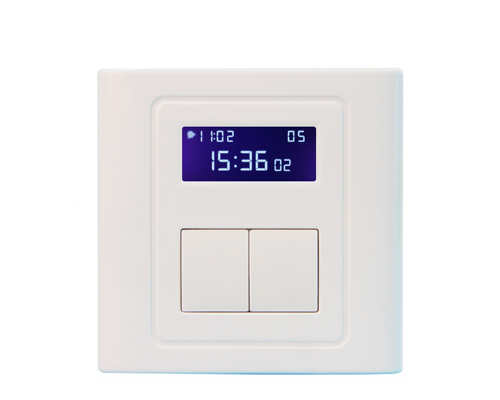
Two buttons for easy operation and controls two loads;
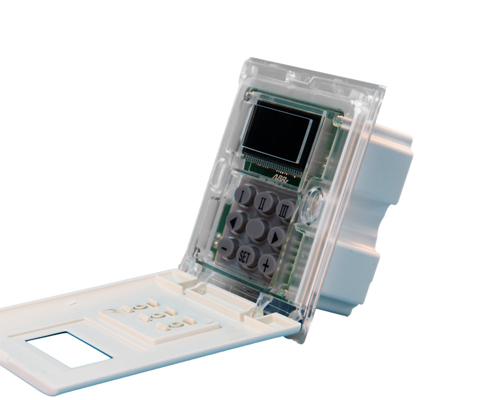
Hidden panel of 9 keypads for setting up timer to prevent inadvertent changes;
Up to 16 preset timing periods with precise On and Off time each day;
LCD display showing the current clock time timing period # and the current status of the switch;
Good for all kinds of loads (Resistive inductive and capacitive);
ABS-V0 flame resistance material; and
Classical 86 series design and high quality build.
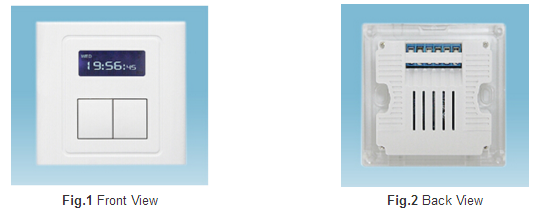
As shown in Fig. 1 BRT-409 timer switch has an LCD display and Two On/Off buttons on the front. The LCD display shows the current time and the current status of the switch. The On/Off buttons are used for turning on or turning off two loads respectively. BRT-409 timer switch also has wiring terminal blocks on its back.
When the On/Off button is pressed The display shows On and the load # and the load will be turned on immediately; and When the On/Off button is pressed again If there is no timing period being set the load will be turned off immediately and the display will show Off and the load # and; If there is timing period being set the load will be turned on automatically during the preset timing period. Press the On/Off button will cancel the timing operation and turn off the load immediately.
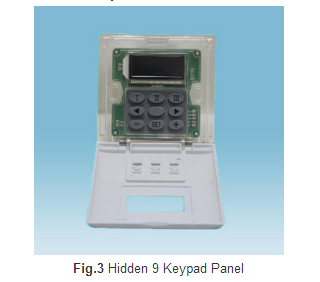
As shown in Fig. 3 the front plate can be flipped down from the top edge. A 9 keypad panel hidden behind the front plate is used for setting up the timer. Please refer to “BRT-409 Timer Switch Setup” for details.
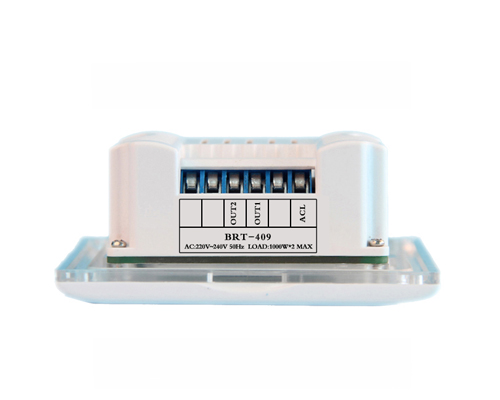
BRT-409 timer switch requires both the hot wire and the neutral wire for installation:
Hot wire (ACL): Coming from the power line with 220V;
and Load wire: Going to the load.

Fig.4 Wiring Diagram of Wall Mount Unit
Warning: Please make sure power is turned off before starting installation!
Fig. 4 shows the wiring diagram and Fig. 5 shows the step-by-step installation instructions.

Fig.5 Installation Guide of Wall Mount Unit
There are three easy steps:
Step one: Use a screwdriver to pry off the front plate in position A;
Step two: Wiring according to the diagram and the labelled ports of the switch; and
Step three: Install screws and front plate.
1.Power the switch with 220 voltages: following the wiring diagram and Installation Guide.
2.Set up Clock Time: Press and hold the SET button until the displayed hours flash. Press – or + to adjust the hours. Press the SET button again the displayed minutes will flash and then press – or + to adjust the minutes. Press th SET button again the displayed day of the week will flash and then press – or + to adjust the day. Finally press and hold the SET button to save the settings.
3.Set up Timing Period for the First Load:
3-1.Set up the “On” time: Press and hold theⅠbutton until the display shows “ON” and “01” and the displayed hours flash. Press – or + to adjust the required “on” hours. Press SET button the displayed minutes flash and use – or + to adjust the required “on” minutes; and
3-2.Set up the “Off” time: Right after setting up the “on” time press SET button again and the display shows “OFF” and “01” and the displayed hours flash. Press – or + to adjust the required “off” hours. Press SET button again the displayed minutes flash and use – or + to adjust the required “off” minutes.
(During setup step 3-1 and 3-2 hold the – or + will adjust the digits quickly.)
At this point both the “on” time and the “off” time have been set up for timing period #1.
3-3.Set up more timing periods: Right after setting up the first timing period pressing "◁ " or "▷" will enter setting up other timing periods. Follow the procedures above to set up the timing periods accordingly. Up to 16 timing periods can be set up.
Finally press and hold the SET button to save the settings or the settings will be saved automatically if there is no keypad operation for 15 seconds.
4.Set up Timing Period for the Second Load:
Press and hold theⅡbutton will start setup for the second load. Follow step 3-1 through 3-3 to set up its timing periods accordingly.
5.Change or Delete Timing Period:
If you want to delete a timing period follow the above steps to change the settings to “--:--”.
BRT-409 timer switch is used for automatically turning on and/or turning off various loads such as fans lights appliances or other kinds of electrical equipment. They are perfect for saving energy and bringing convenience and safety to our daily life and work.
They have wide applications at various locations such as homes schools laboratories hospitals offices etc. The typical application scenes include:
Schools: Automatically ring the bells according to a fixed time
Hospitals or Laboratories: Automatically turn on and turn off UV disinfection equipment to isolate operators from harmful UV exposure.
Farms: Automatically turn on or turn off breeding equipment or lighting equipment for animals.